Monday, April 11, 2022

Nested sprites in Snap!

There is a Swimmer in Snap Examples which features 13 sprites attached to each other but I wanted a simpler example to teach to new Snap learners.

Read page 10 of the Snap! Manual for an overview of Sprite Nesting: Anchor and Parts:
Sometimes it’s desirable to make a sort of “super-sprite” composed of pieces that can move together but can also be separately articulated

I asked in the Snap Forum and cymplecy made a few suggestions: a car spinning its wheels, a Ferris wheel or a face blinking its eyes or moving its mouth.

CAR SPINNING ITS WHEELS

car_spin_wheels

Cymplecy observed that it's easier to do this in Snap! than Scratch.

Set the car pivot point half way between the 2 wheels and horizontal with the centres of the wheels. Otherwise, the wheels will spin out when you bounce off the wall.

I made the wheel by duplicating the car and rubbing out everything except one wheel. Set the pivot point of the wheels in the centre of the wheel, of course.

I reset the spin direction of the wheels to correlate with the car direction. It also works fine if you change the size of the car.

FERRIS WHEEL

ferris_wheel

If teaching this to beginners I'd give them the wheel and carriage to start with and teach the sprite nesting technique. The parts have a synchronous / dangling flag. The dangling option works well here, as the wheel rotates.

Saturday, April 09, 2022

Scratch chimney smoke clones

I got this idea from a project by njasia (How to Clone) on the Scratch site. The main changes I made were using a timer to vary the wind.
My chimney smoke clone project is here

The smoke particles were made with a ball filled with a black colour

The size and brightness of those particles was set to realistic values
Smoke clones were created
A wind variable was made and the value randomised every 3 seconds by resetting the timer every 4 seconds
Realistic smoke effects were achieved by increasing y (to make it rise) and adding the changing wind to another random x (to achieve some spread of smoke). When the smoke clones touched the top edge they were destroyed
This could be varied to make fireworks, snow or mouse trails, not to mention games. as suggested in the Scratch wiki here

Update (15/4/22): Animating a visual poem by Joan Brossa with Scratch
A how to article with a link to a great project. This one is more work because you need images of the whole alphabet.

Sunday, April 03, 2022

innovation meets resistance: the war between ancients and moderns

Innovation meets resistance. Let’s assume that there is an innovation or a raft of innovations that would significantly enhance a community or education system. But the bearer discovers that they can’t get them implemented. What are the factors at play preventing this happening?

  1. Those in power (ie. those with more opportunity and influence) don’t fully understand the innovation or it’s importance (and are reluctant to admit this). Although there is often some understanding in my honest opinion it is usually shallow, not deep. Innovation is often complex and requires deep understanding of a variety of factors. If you don’t understand it then how can you really help to implement it?
  2. There might be some partial understanding but a lack of will or energy to solve all the problems that will arise in implementing the innovation. Innovation does require energy, determination and ability to solve problems. Innovation is usually not easy.
  3. Innovation often requires special infrastructure, organisational factors and new technology, which in turn require money. If these are not put in place then the chances of success are significantly reduced. New ideas will not succeed by magic, their implementation requires careful planning and foresight.

All three are required for innovation to be successful. If understanding of any one of the three is shallow then success will be less likely than it could be.

I have been trying to introduce a variety of innovations into Alice Springs: block coding (Snap as well as Scratch), app inventor, the Fab Lab, microcontrollers, Maker Education, 3D printers. The focus here is on what Stager and Martinez have called the 3 game changers. One goal here is to bring education into the 21st Century. Although I have had a little success it is frustrating how slowly things are progressing.

What is happening here? That is what I am trying to understand. Australian education is a huge, centralised system (eg. ACARA). This system is so preoccupied with reproducing itself that it doesn't seem able to recognise or evaluate a good innovation. The responses I get vary from being ignored completely or someone might initially show interest but then forget about it (and then change their story) or if I press I might get some comical bureauspeak in reply. What I have learnt is that it is really, really hard to introduce a good innovation. See the quote from the article below, about the war between the ancients and moderns:
It's been proven time and again that any institution that makes it the responsibility of the general manager to be in charge of both the ongoing business and the innovative efforts for creating tomorrow's new and different business usually ends without significant innovation
REFERENCE
MINE
the 3 game changers: high level overview
21st Century Curriculum
maker space and middle school curriculum reform
your town needs a community Fab lab
Organising a 3D printer activity
Scratch course new upgrade
the teaching of coding
OTHER
Martinez, Sylvia and Stager, Gary. Invent to Learn: Making, Tinkering and Engineering in the Classroom. 2nd Edition (2019)
Ridley, Matt How Innovation Works: And Why It Flourishes in Freedom (2020)
Why Real Innovation Is Always Met With Fierce Resistance … and What To Do About It
extract from the last one:

Today, many universities and colleges are entering the field of web-based degree granting and certification programs. The savvy schools such as Cornell and Penn State have created completely separate, autonomous units to deliver, market and grow online training. Others are following their example.

If this isn't done, it's almost guaranteed that "a war of the ancients against the moderns" will erupt and threaten the internal upstart web-based learning organization–and deprive it of the resources needed to innovate successfully.

To repeat: It's been proven time and again that any institution that makes it the responsibility of the general manager to be in charge of both the ongoing business and the innovative efforts for creating tomorrow's new and different business usually ends without significant innovation.

And the traditional blame game inevitably occurs. Everyone becomes frustrated, demoralized and (many times) embittered.

Saturday, March 19, 2022

Own your own factory, that makes more factories

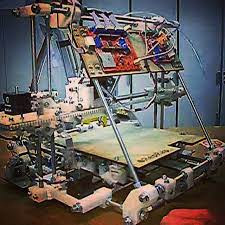
3D printing philosophy is provided to us by Adrian Bowyer, the founder of the RepRap project.

RepRap stands for self replicating rapid prototype.

The theory was initially thought of by John von Neumann in the 1940s with his Universal Constructor concept. His universal constructor is a self-replicating machine in a cellular automata (CA) environment. The states of the cells change at discrete time-steps. The new state of a cell is computed from the previous states of the connected neighboring cells using predefined rules. He proved that the dynamics exhibited by such a cellular automaton are similar to the biological processes involved in self-reproduction.

The original idea of a Universal Constructor was of a machine that would both self-copy and self-assemble - as a bacterium or a daffodil do.

In nature all four possibilities exist: things that neither self-copy nor self-assemble, like rocks; things that self-copy but don't self-assemble, like viruses; things that self-assemble but don't self-copy, like proteins; and finally things that both self-copy and self-assemble, like you and me

In 1970, John Conway introduced a CA called Game of Life which was in digital form only. See the wikipedia entry, Conway's Game of Life, for an overview

Building further on this background Adrian Bowyer developed the RepRap project. RepRap is like biology, machines making their own parts. This is because it can self-replicate with the symbiotic assistance of a person. Anything that can copy itself immediately and inescapably becomes subject to Darwinian selection, but RepRap has one important difference from natural organisms: in nature, mutations are random, and only a tiny fraction are improvements; but with RepRap, every mutation is a product of the analytical thought of its users. This means that the rate of improvement should be very rapid, at least at the start; it is more analogous to selective breeding

The most practical / realistic prototype so far is the open source 3D printer. (open hardware, open software).

Open source is far more open to evolution than proprietary. I’m aware of several open source 3D printer companies. From these, I chose Prusa since their reviews are so good. Recently I built a Prusa i3 MK3S+ from a kit and was very impressed by the community. This took the form of very helpful build instructions with comments added by fellow builders. This is normal for open source communities but foreign to proprietary communities.

This article is just a brief summary of some of the key ideas behind the Rep Rap project, led by Adrian Bowyer. The references provide more detail.

Reference:
TEDxEWB - Adrian Bowyer - Replicating Rapid Prototyper Talk 16min 2010 London
He finishes this talk with “why can’t everyone own their own factory, that makes more factories

Wealth without Money (2004) by Adrian Bowyer
I have borrowed heavily from this essay

The Self-replicating Rapid Prototyper – Manufacturing for the Masses (2006)
There are essentially three parts to any rapid prototyping machine:
  • One or more material-deposition or write heads
  • A Cartesian robot, and
  • The software to drive them
Why is 3D printing such a powerful way to make solid objects? (2013)
Because additive works 2D at a time (layer on layer) it is far simpler than subtractive, cutting out from a solid block (which requires 5 dimensions + other considerations)

Best Open-Source 3D Printers of 2021 | All3DP

REPRAP self replicating rapid prototyper
RepRap is humanity's first general-purpose self-replicating manufacturing machine.

Rep Rap Ltd
RepRap Ltd was established in 2009 and specialises in research and development in self-replicating open-source 3D printing.

Sunday, January 16, 2022

little robot with the Hummingbird bit


Little robot is a steal from Tom Lauwers Birdbrain technologies site.

The key idea is to place 2 position servos to obtain flexible neck movement, both left / right and up / down. Follow the link for detailed instructions on the Birdbrain site.

SOME CODE
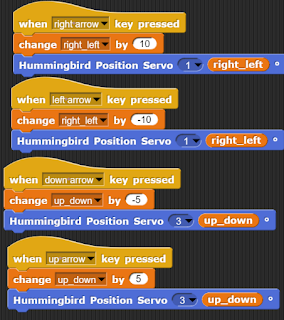
Here is some code, using variables, to control the robot's head movement using the arrow keys (I wrote some separate code for the video):
Here are some rough notes about what I did, some mistakes I made and how to do better next time:
  • Use a bigger box to make a 7.5 cm cube box
  • Need to screw into the servos. I forgot and it fell apart.
  • Add duct tape to first servo to stop it moving (photo)
  • Add duct tape to servos and servo horns so they don't become glued up (photo)
  • Mark face position on the bottom cube to avoid confusion
  • A smaller thickness of hot glue might work better than big blobs (I read up on hot glue guns)
  • When attaching the top cube hold bottom firmly on RHS and press the top cube in, not too hard, in the correct position on the LHS (initially my positioning was all wrong)
  • Leave significant gap for head movement b/w top and bottom cubes (otherwise down movement will be restricted)
  • Leave RHS bottom door open until everything else finished. I still haven't closed it.
  • Calibrate optimal rotations when coding (if you rotate too far you might break it). I settled on left-right 10 to 170 and up down 65 to 115
Extra equipment:
  • Small screwdriver
  • ifixit blade for prising off dry hot glue when you have to redo
  • Super scissors
  • ruler 3 inches = 7.5 cm
  • duct tape
  • masking tape
  • googly eyes
Related:
Would you like to see a toilet roll dance?
bee waggle project with the Hummingbird bit

Organising a 3D printer building activity

This is the printer I built from a kit.

After considerable research I bought an Original Prusa i3 MK3S+ 3D printer. There are thousands of 3D printing companies out there. My first consideration was the open hardware / open software criterion. Prusa is part of the RepRap project (humanity's first general purpose self replicating machine) so they went onto my short list. Then Prusa has the best reviews so I was sold.

Through talking to teachers who use 3D printers I became aware of their main limitation for school use. They are slow. Even a simple print takes about 20 minutes so with the setup and remove the print time added on you will only see one student print their design in a normal lesson.

So, I floated the idea of families buying a kit, students assembling them at school and the family keeping the printer. Everyone I mentioned this to almost immediately said “great idea”. So we sent the invitation out to the school community and so far eight families have come on board.

The advantage of this plan is we get 3D printers into the school community without having to worry about the slowness problem. And to build a 3D printer is a really good step towards understanding how they work.

I needed to get a head start on this so I found a company in Australia, 3d Print Specialist that sold the kit. It arrived just before Xmas day and then the fun really started!

We are advising the parents to buy from Czechoslovakia, it is cheaper that way, but there is a considerable lag time.

It says on the Prusa that their fastest customer built the MK3S+ in 4 hours!! Ha ha. Well, I guess I'm their slowest customer. My rough estimate for my build time was 75 hours! I certainly didn't rush!

The build instructions are on the Prusa site:
Original Prusa i3 MK3S+ build instructions
Original Prusa MINI+ build instructions

The instructions are very well thought out, colour coded with pics, with numerous warnings in red. Fellow builders from the community leave comments at each step, which provide essential further help. Of course this arises from the open hardware and software ethos of the Prusa community.

It gave me hope to find out that others found it hard, some even found it harder than me!

In the end I was successful! The last, testing stage was nerve racking since some of the tests take a while. Then when I got to first layer calibration I wasn't confident since I had to nudge the z axis since the test print wasn't sticking on the sheet. Really I just did this by guess and test and it came our correctly after a couple of guesses. Here's my just about perfect test print:

Without going into all the detail I'll mention some of the techniques I learnt along the way since these will be valuable to pass onto my students later:
  • don't throw anything out prematurely
  • screw seating technique, watch this video from Alex
  • how to exert force without breaking the part (force and support at the same time)
  • use the grease out of the bearing bags to grease nuts that are hard to fit and the rods before sliding into the misumi bearings (one reason not to throw stuff out once used)
  • use of AA battery or flat side of screwdriver to push in the belts
  • extruder cable sorting technique (one comment was very helpful here)
  • bending the zip ties using the pliers and wrapping around

The toughest parts of the build are the extruder and fitting all the cables into the too small Einsy box (lots of complaints from the builders about that). I'll show pictures of those parts so you are forewarned!
Here is a ridiculous video showing a young girl, Aurora, building the whole thing in 38 minutes

Monday, January 10, 2022

understanding Omicron

In looking for authors who *understand* omicron I haven't found anyone better than Eric Topol. I was hoping to summarise but other things got in the way. Below are a few links to recent substack articles. To follow him regularly his twitter feed is here
March 7: The Epidemic of Covid Complacency
Feb 10: Separating Facts from Myths in the Pandemic (interview, 32 minutes)
Jan 30: A Shot in the Dark
Jan 23: Where do we stand with Omicron?
Jan 5: Humans 2 Omicron 1
Jan 10: We are very lucky
Dec 16: Why Paxlovid is a Just-in-Time Breakthrough
Feb 2021: Variant-proof vaccines — invest now for the next pandemic

Monday, January 03, 2022

ozSAGE Omicron alarms

An ozSAGE recent report (December 30th) about Omicron warns us not to become complacent in the face of the "it's mild" narrative. Well worth reading the whole thing here

Some key points:
  • Hospitalisations in Australia are increasing sharply, see the graph on page 3 (although their text seems inaccurate about ICU increases which the graph shows are small)
  • Health systems are likely to be overwhelmed, especially in regional centres
  • NSW is already warning people not to expect access to hospital care (doesn't this mean that our health system is already overwhelmed?)
  • Omicron variant is at least as virulent as the original strain of COVID (this is a key point, obviously it's complicated and requires more evidence and context - but sounds like bad news for the unvaccinated and otherwise vulnerable)
  • long COVID affects brains, heart, kidneys (link provided)
  • medical staff burnt out
  • GPs expected to carry the burden for failing hospitals - not realistic
  • Boosters required urgently but it's not happening quickly enough (I read elsewhere that astrazeneca which most elderly people received only provides 6% protection from omicron)
  • Expect increased deaths for vulnerable groups (the elderly, low socio-economic groups, first nations people)
  • Children hospitalisations have increased in both the UK and the USA

Sunday, January 02, 2022

books I am reading in 2022

BOOKS and some articles 2022

Arthur, Brian. The Nature of Technology (2011)
Bhattacharya, Ananyo. The Man from the Future: The Visionary Life of John van Neumann (2021)
Blikstein, Paulo. Travels in Troy with Freire: Technology as an Agent in Emancipation (2008)
Constructionism 2018: Constructionism, Computational Thinking and Educational Innovation: conference proceedings
Deutsch, David. The Beginning of Infinity (2012)
Disessa, Andrea. Computational Literacy and the "Big Picture" Concerning Computers in Mathematics Education (2017)
Gee, James Paul. Literacy from Writing to Fabbing (2012)
Harvey, Brian & Monig, Jens. SNAP! Reference Manual 7.0 (2020)
Kelly, Kevin. The Inevitable: Understanding the 12 Technological Forces that will Shape our Future (2017)
Mahood, Kim. Kartiya are like Toyotas (2012)
Marcus, Gary and Davis, Ernest. Rebooting AI: Building Artificial Intelligence we can Trust (2019)
Newell, Barry. Turtle Confusion: Logo Puzzles and Riddles (1988)
Ridley, Matt. How Innovation Works (2020)
Shellenberger, Michael. SanFranSicko: Why Progressives Ruin Cities (2021)
Smil, Vaclav. How the World Really Works (2022)
Cynthia Solomon, Brian Harvey, Ken Kahn, Henry Lieberman, Mark Miller, Margaret Minsky, Artemis Papert, Brian Silverman. History of Logo (2020)
Stager, Gary. 20 Things to do with a Computer: Future Visions of Education Inspired by Seymour Papert & Cynthia Solomon's Seminal Work (2021)
Thornburg, David. Learning to Code: An Introduction to Computer Science Through the Art and Patterns of Nature. Snap! Edition. (2021)
Topol, Eric. Deep Medicine: How Artificial Intelligence can make Healthcare Human again (2019)
Upton, Eben and Halfacree, Gareth. Raspberry Pi User Guide 4th Edition (2016)

Previous: Books 2021

Wednesday, December 22, 2021

Colour your sound using Snap!

A computer program that transforms sound into colour and then colour back into sound would be sure to blow a few minds.

What happens then: Fun! Learning! Unpredictable but interesting pathways!

I encountered this briefly through Jay Silver / Eric Rosenbuam (who I think of as the very clever hippy digital innovators) and then later through Jens Monig (Snap! developer). I'll write up the Jens version for now and add some references from the creative hippie pair to write up later. I can see this blossoming into a fun, innovative course.

If you prefer go straight to the Snap! program (Whistle Draw) and explanatory video by Jens

Jen is a master of Snap! and I learnt a lot as well as having much fun in emulating his program. I'll document it here since I'm planning to use it at school.

The Synesthetic pair here is sound and colour. At first sound produces colour and then the process is reversed so that colour produces sound

I'm including some preliminaries and extra explanation which Jen leaves out. With Snap! colours I find it necessary to check the defaults so that the colours work. I set the pen saturation and brightness to 100 and transparency to 0. Then if hue is set to 0 it shows red and changing hue through 0 to 100 goes through a ROYGBIV spectrum.
The colours are working as they should be so now we investigate and calibrate the microphone:
I whistled a tune into the microphone and observed the range of frequencies. Since they started at around 700 Hz I subtracted 700 to obtain a starting point of zero. Then I divided by 10 so as to roughly bring the values into a 0 to 100 range. This range coincides with the full range of colour values in Snap! Here is the calibrated microphone:
Next up, write a procedure that will produce variations in colour depending on the sound frequency:
I inexpertly whistled "Twinkle twinkle little star" and recorded the colours by moving the mouse. It looked like this:
You have to untick the sprite's draggable box. This held me up for a while so I'll offer an explanation.

In everyday usage when the pen is down we want to be able to drag the sprite without drawing. That could be inconvenient. When the draggable box is unticked the sprite disappears. You can show it by right click > show on the sprite but can't drag it. When you run the procedure forever [go to mouse pointer] the sprite does show and follows the mouse pointer (not the same as being dragged)

When the pen is down and you run forever [go to mouse pointer]:
  • When draggable box is ticked drawing happens with mouse up but not mouse down.
  • When draggable box is unticked drawing happens with both mouse up and mouse down (the behaviour we want for this program)
Then I wrote a procedure that could play it back. This is the inverse of the earlier procedure, this time converting colour to sound:
Then when I ran my mouse over the image (with mouse down) my inexpert tune played back!

Finally, Jens shows how to save the image so you can try new ones and return to the saved ones later. Click on the Stage and run this code:
You can see the image is saved under the Costumes tab!

Jens goes onto make a piano by whistling the correct notes. But even if you can't whistle well (like me) all you have to do is put blobs of ROYGBIV on the screen to make a piano that might work. Try it and see.

Here is the Snap! Colour your Sound program I ended up with.

When I read up on the earlier work by Jay and Eric (references below) I can envisage lots of new themes emerging from Jen's program. I'll try to get back to this later.

REFERENCE
LENS X BLOCK: World as Construction Kit Jay Silver PhD thesis
Eric Rosenbaum: Designing for Creative Play
Singing-fingers
NB their explanatory notes
Twinkle
colour code
(and there are more Jay Silver videos on the sidebar)

Saturday, December 11, 2021

from Beetle Blocks to a 3D print

I finally got my hands on a 3D printer and have printed a type of project which I think will be suitable for classroom use.

When you talk to teachers who use 3D printers they say a big problem is that they are slow. This makes them impractical since all the students want to print.

But if you print 2D shapes with a small height then that is a lot quicker.

Josh Burker has an introductory 3D print project in his “Invent to Learn Guide to More Fun” book. A rotated heptagon makes an attractive pattern. Maths and Art combined.

Josh used Beetle Blocks to make the rotated heptagon project. It is SNAP-like code. First you make a heptagon block using 360/7 as the angle. Then you spin that block ten times on the z axis,
repeat 10 [rotate z by 36]. Some great maths learning here.

I spoke to a very helpful teacher in Melbourne (thanks Veena) who runs a class with eight 3D printers. She said that the Flashforge CreatorPro2 was a worthwhile buy. They run 24/7 at her school.

My school bought a Flashforge and I setup our new printer. A couple of YouTube videos were very helpful

FlashForge Creator Pro 2 IDEX 3D Printer Review and Test
IDEX 3d Printer Review | Flashforge Creator Pro 2

A boring test print which came with the machine worked ok:

Then I tried the rotated heptagon. It printed with a base and was too small. So I had to read the printer manual to work out the correct settings.

On the third try I was happy with the outcome.
The print took 20 minutes. This is quick for a 3D printer but still not quick enough for a classroom setting. I can see why Veena has eight of them.

This is my first 3D print where I wrote the code and did the printing.

Notes on software function and formats:
You can save Beetle Blocks files in XML format and STL formats. The XML (Extensible Markup Languge) is for going back later and editing the software which made the shape. The STL stands for Sterolithography or Standard Triangle Language or Standard Tesselation Language. This is probably the most commonly used format for 3D printing.

The Flashforge program that reads the STL file is Flashprint. You can edit the STL in Flashprint. eg. view it from different perspectives, move it, rotate it, scale it etc. You then send the file to slicer software which has other features, eg. Raft, enable Wall, enable Brim and much more. I had to read the manual to understand these important features. The Flashforge slicer software format is *.gx. It's proprietary. The generic name for these sorts of files is G-code. The G-Code tells the printer what to do, where to move, how fast to move, and what path to follow.

REFERENCE:
Burker, Josh. The Invent to Learn Guide to MORE Fun: Classroom Technology Project (2018)
The Beetle Blocks Primer pdf, 68pp
Eric Rosenbaum website. Eric is one of the makers of Beetle Blocks. A very interesting person. He is also a co-creator of Makey Makey and is a digital music innovator. Click on the Media link to see his talks and papers.

Wednesday, November 10, 2021

the raging Todd river

I heard thunderstorms all night last night. When I woke up I had received a message that school was closed for years 7-11 due to flooding in Charles Creek. I had never seen water in Charles Creek before. I went for a drive later and saw an IGA van stuck, directly outside the school.
When I drove down to Wills Terrace, the road was blocked. I parked and walked towards the river. There were people and police everywhere. I wasn't allowed close. An OLSH student pointed out a guy who was hanging onto a tree in the middle of the raging river, just to the left of the 2 metre flood sign. You can see him if you enlarge the photo. Someone said he had been there for 5 hours.
I went back later after he had been rescued. He had been standing on top of his wrecked car, which had been swept off the causeway:
I drove back to the school and took some more pics of the causeway there and a family having a swim:
Just had a look at some stats. In the last 24 hours there has been 70mm of rain. You have to go back 20 years to beat that (source)

update: Rainfall since 9am yesterday at #AliceSprings Airport is 95.8mm and rising. 24 hour rainfall has not been this high since 30 January 2001.

Related:
The Todd River
Three years in Alice

Friday, September 24, 2021

the 3 game changers: high level overview of the possibilities

The 3 game changers are: (i) block coding (ii) physical computing with microcontrollers such as the microbit (iii) Fabrication Labs, called Fab Labs if community based and Fab Learn Labs if school based.

The 5 types of machines found in a Fab Lab are laser cutter, 3D printer, vinyl cutter, CNC milling and digital embroidery machines.

Here are some possible outcomes that I am seeking support to create. They can be framed as community initiative or school based initiative. The educational and community goals overlap and reinforce each other. They are synergistic.

1) Campaign for an Alice Community Fab Lab (open to the community). This would be great for Alice Springs but also for your town / city where ever it is
The Fab Foundation
Welcome | FabLabs

2) School based Fab Learn Lab (same sorts of machines but desktop variety and school based)
FabLearn Digital Fabrication in Education
FabLearn Labs are a growing network of educational digital fabrication spaces around the world. These labs, developed in collaboration with K12 schools and university partners internationally, put digital fabrication and other cutting-edge technology for design and construction into the hands of middle and high school students.
- source
3) Introduce new subjects at primary, secondary and tertiary level into the existing curriculum based on the
  • 3 game changers (block coding, physical computing with microcontrollers, Fab Lab, and
  • 5 types of machines: laser cutter, 3D printer, vinyl cutter, CNC milling, digital embroidery)
I have provided a list of possible new subjects, many of which have already been well developed. My list will grow further as I deepen my knowledge about the third game changer.

4) A Fab Lab or Fab Learn lab can be introduced incrementally machine by machine spelling out how they meet local needs.
Eg. The Fab Lab in India, Vigyan Ashram grew out of and was synergistic with local work performed earlier by Yogesh Kulkarni

5) Significant structural curriculum reform in schools. Everyone knows there has been a computer revolution but many schools, in fact most schools, have yet to figure out how this revolution can enhance student learning in amazing ways. We have been procrastinating for 50 years now. The Constructing Modern Knowledge group has been leading the way here, see CMK Press – Invent To Learn. Interestingly, I recently discovered that Kurt Seemanns one of the founders of the Centre for Appropriate Technology in Alice Springs has been promoting similar ideas for a long time, which he calls Technacy.

Related: Your town needs a community Fab Lab

Monday, September 20, 2021

21st Century Curriculum

Is 21st Century computational education happening in your school?

The 3 game changers are coding, physical computing and the fab lab or maker space. I agree with this insight which comes from Sylvia Martinez and Gary Stager in Invent to Learn. I argue that to have a genuine 21st C education your school has to understand and grasp these game changers firmly and run with them.

I describe below possibly courses which constitute school curriculum reform informed by these game changers. Some could be taught as standalone subjects, others could become part of a curriculum integration endeavour, combining various existing subjects. This list by no means exhausts the possibilities. As I learn more about the third game changer (fabrication) the list will grow.

These curriculum offerings can be classified in various ways:
  • appeal to students in general;
  • appeal to girls (who have missed out in the past);
  • appeal to groups of special interest (indigenous, the disadvantaged);
  • which traditional subjects are integrated;
  • hardware and software requirements.

Perhaps I could do that next time. For now I’ll just stick to listing and briefly describing the courses.

1) Scratch Story Telling:

The core idea is that Scratch multimedia coding is for telling stories in an interesting and entertaining way. I have developed several iterations of a short course I teach to Year 7s: Scratch course new upgrade

2) Snap! Build Your Own Blocks

Scratch is great for a quick and relatively easy start to coding but you still meet computer guys who regard it as a mickey mouse language since certain features are missing. With SNAP! you retain the block code (which makes it easier to learn) and all data types are first class. See Ch IV of the Snap Reference Manual for the detail.

I have started and enjoyed the SNAP “Beauty and Joy of Computing” course more than once without finishing it

There are other SNAP courses available at openSAP:
Get Coding with SNAP!
From Media Computation to Data Science

3) Turtle Art: Web browser version
Students like this arty version of logo a lot! So far I have used this in two ways:
(a) Bottom up – draw a square, then work out how to draw various regular polygons, then explain how the colours work etc
(b) Top down. Give students the code of an attractive finished product. Copy the code to make it. Students love doing this because the final products are so attractive. The cards I use come from a link to a pdf in this article by Gary Stager Turtle Art Software

4) ArtBotics with the Hummingbird Bit

I put a proposal to my school for a new course, called Artbotics, a combination or portmanteau of Art and Robotics. The course application was successful. Gender balance is important so the outcomes do not reflect “toys for the boys”. The art and craft components of the projects should have appropriate weight. Artbotics rather than robotics. Build provocative, tangible sculptures with robotic actuation and sensing

This wasn’t my original idea but came from a PhD thesis by Debra Bernstein which is available at the BirdBrain site.

Follow this link for the sorts of things that can be made. I have built a couple of machines with my own copy of the Hummingbird Bit

5) Makey Makey activities

I am in the process of compiling Makey Makey activities (banana piano, cardboard guitar, tin drum, egg container organ) and trialing them with indigenous students at Polly Farmer. They are popular.

Jay Silver’s PhD Lens x Block: World as Construction Kit thesis words, "World as Construction Kit", are a good introduction to what he is trying to achieve.

6) Android phone App Development with MIT App Inventor

I’ve written several apps for my phone with this block coding language. These include apps you can draw with (Digital Doodle), a game (Pong), a quiz (about US Presidents) and music (xylophone). I then wrote a more ambitious app to help users pronounce Arrernte words, the local language here in Alice Springs (Mparntwe).

7) Maker Course for the Circuit Playground Express (CPX)

This course, developed by Rob Morill, contains 12 guided projects. I have made several of these with Year 7 students successfully (Light Box, Balance Board, Helmet, Fabric Friend, Gondola and Light Bot) and use them for demos when explaining the benefits of the CPX.

8) Micro:bit course
This Microsoft course is targeted to middle school grades 6-8 (ages 11-14 years)

9) CSDT (Culturally Situated Design Tools)

This site starts with artistic themes, most of them of indigenous origin, and then develops computer algorithms to develop them on the screen. Snap! is often used here. In some cases the art is then converted from digital form to physical form, for example, by etching with a laser cutter.

I have developed one CSDT exemplar of my own using a Papunya Tula art theme of dotted circles.

10) Computer Game Making

a) This is an oldie but goodie since most students like computer games. I developed a course years ago using Game Maker software, developed by Mark Overmars. Game Maker was great but, being a FOSS advocate (Free and Open Source Software) I lost interest after he sold it to a proprietary company. You can also make computer games using Scratch (although not as exciting as Game Maker for that purpose) and I offer that as an extension in my Scratch course above (Make either pong, flappy bird or a maze game).

b) MakeCode Arcade
Microsoft MakeCode Arcade is a web-based beginner-friendly code editor to create retro arcade games for the web and for microcontrollers
Go to Documentation for links to courses, tutorials, lessons and much more
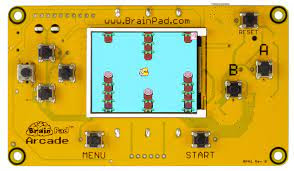
Go to hardware to see the boards on which MakeCode Arcade games run. There are 13 listed at this point, I have one of them, the BrainPad Arcade.

c) Minecraft
Introduction to Computer Science with MakeCode for Minecraft
This is a semester-long course targeted at middle school grades 6-8, as an introduction to Computer Science

11) MicroBlocks, the Internet of Things(IOT) and Raspberry Pi

The developers of MicroBlocks include the lead developers of Scratch (John Maloney), SNAP! (Jens Monig and the Hummingbird Bit (Tom Lauwers) About - MicroBlocks so that alone should tell you that MicroBlocks is special. I had to read an article by John Maloney before I understand how it was special. MicroBlocks supports both live programming and autonomous operation. Users can see and test code changes immediately, yet their code continues to run when the microcontroller is untethered from the host computer

The Activity cards are here. Note that some activities involve the WebThings Gateway on Raspberry Pi.

12) Digital wearables or E Textiles

Stitching the Loop is a fully developed course in E Textiles in which students explore electronic textiles (e-textiles): articles of clothing, accessories, or home furnishings with embedded electronic and computational elements. It meets design, hands on and curriculum integration criteria. For more information watch the video first and then follow the links. Course developers include Jane Margolis who has written a book about why disadvantaged groups don’t get access to computer skills (Stuck in the Shallow End) and Yasmin Kafai who has co-authored a book about why children need to learn programming (Connected Code: Why Children Need to Learn Programming)

Video: Stitching the Loop
Introducing: E-Textiles – Exploring Computer Science
E-Textiles Curriculum & Projects – Exploring Computer Science

I’ve also bought a book by Sahrye Cohen and Hal Rodriguez: Make It, Wear It: Wearable Electronics for Makers, Crafters and Cosplayers (2018) which combines electronics with fabrication technologies such as 3D printers and laser cutters to produce wearable products. Actually, the most commonly mentioned machine in this book is the sewing machine. Just to give you a taste the projects include a Fiber Optic Fabric Scarf, a LED Matrix Purse and others.

13) Tape Blocks
TapeBlock: Creative Circuit Making for All
Creative Circuit Making for All: Including People Living with a Disability
Developed by Dr Kirsten Ellis

I have used these with a Year 7 Down Syndrome girl and she could build and decorate a circuit and explain how it worked. Much more can be done which is outlined at the TapeBlock site.

Sunday, August 29, 2021

Thoughts on reading Paulo Blikstein (the founder of the Fab Learn Schools Movement)

This article then is not a summary but thoughts arising from a 2013 article by Paulo Blikstein. First, a couple of starting assertions:

(1) We, humans, are homo faber (Latin for Man the Maker), the concept that human beings are able to control their fate and their environment as a result of the use of tools.

Making and the ability to make is a good thing. Although bad things can be made and most things can be used in a bad way, there is a general link between progress and making. I’m simply asserting this here as true. I have argued the case in the past (see reference) and am happy to continue the argument for those who want to argue.

It follows on from this (a corollary) that an enhanced ability for individuals or small groups to make can transform or at least complement commercial consumption. You may want to tweak the commercial design in a way that suits your needs, functional or aesthetic. You might think of a new design that hasn’t been produced yet. Or there may be local shortages or special needs or delays in a world ravaged by a pandemic.

(2) The other starting point is that new things replace or transform old things. We have known this for a while now. I grew up in a world without the internet or smart phones. They represent the first two digital revolutions: (i) Following Moore’s law computers shrank from house size to pocket size (ii) Internet revolutionised communication, cost and abundance of information and storage. Those revolutions continue. Most people want to jump onto those revolutions. They are overwhelmingly seen as a good thing.

The third digital revolution is the Fab Lab. This was developed by Neil Gershenfeld (from 2003) and then brought into schools by Paulo Blikstein (from 2008). Since then Fab Labs have been growing exponentially. Some might argue that this is a wrong reading of recent history and the future. There might be other legitimate candidates for the next digital revolution. Once again, argument is welcome.

So, why was the Fab Lab born? Because these things are desirables for self directed making:
  • Design skills
  • Powerful, multifunctional machines at reduced cost. There are 5 main types of machines involved: Vinyl cutter, 3D Printer, Digital Embroidery, Laser cutter and CNC machines
  • Open source hardware and software

Blikstein’s article is worth reading for the discussion of the rocky path of the birth and evolution of Fab Labs in more detail.

SCHOOL or EDUCATIONAL ISSUES

If schools value an activity then they build a space for it: Science labs, PE spaces, computer labs etc. A Fab Learn lab doesn’t have to have all the capabilities of a full Fab Lab, but needs to have enough to put students onto that pathway. The space needs to be created. Then we can argue about the detail of what goes in there, what training is required etc.

Paulo Blikstein provides a theoretical base for this movement. He links Dewey (experiential learning) to Friere (cultural based learning) to Papert (constructionism). I’m well read in Papert but only know a little about Dewey and Friere. I plan to read another Blikstein article where he discusses Friere in more detail. See references.

Some good points made by Blikstein about the potential and dangers of introducing Fab Learn Labs to schools are summarised below. Read his article for much more detail.

Everyone has some experience in making. Hence, the Fab Learn approach augments existing skills and hence provides a solid starting point for nearly all students.

The new machines mean that to a large extent digital work replaces manual work in the making process. This creates opportunities to transform the “toys for boys” situation which prevails in most maker spaces.

You can make things with cardboard, true. The new machines mean you are making a more professional, durable, aesthetic and satisfying product

It is highly desirable that school curriculum be transformed (project based learning and a merging of subject domains) and that longer time slots be introduced to allow for completion of complex projects. Existing time slots (eg. 60 minute lessons) can be seen as more efficient but force the teacher to provide lots of scaffolding to get the job done. Learning new skills, some of them complex, properly always involves error correction and this takes more time.

The process of designing and making something you want to make provides a great boon for motivation and involvement. It also introduces the risk of despair when things go wrong. This does represent a transformation of a common school practice where things are sometimes (often?) dumbed down to a point where failure is rare.

In any school process there is always the danger of trivialisation. This can arise from both students and teachers, eg. Keep making keychains on the 3D printer rather than a more challenging task. The role of the teacher is to steer learners towards complexity.

Reference:
Digital Fabrication and ‘Making’ in Education: The Democratization of Invention (2013) by Paulo Blikstein

Travels in Troy with Friere: Technology as an agent in emancipation (2008) by Paulo Blikstein (I’ve promised myself to read that)

Meaningful Making Books 1 & 2 (free to download!)

Some old articles I wrote about technology and progress:
Technology and indigenous progress
Technology as Trickster, revisited