Saturday, May 29, 2021
CPX light box
This is a relatively pure integration of digital technology with art. The Circuit Playground Express (CPX) provides backlighting for drawings done on tracing paper.
Materials: Shoe box, light card, CPX, tracing paper
I'm a poor artist so I googled "easy to draw pics" and picked some from this site. I used a 6B pencil.
Here are a couple of videos which show how it works:
Sunday, May 16, 2021
CPX fabric friend
When I made Leah Buechley's Lilypad interactive stuffed monster I said then that I would also make another version using the Circuit Playground Express (CPX).
This time I'm using the pins more than the sensors so I'll show that diagram:
Rob Morrill has included this project in his course and called it Fabric Friend, so I took those instructions as my guide.
This is the first time I've used adafruit's Flora RGB smart neopixels and a LiPoly battery so there was significant new learning in this project for me.
First step was planning the design. I wasn't original here and used a similar design to my previous stuffed monster. It's important to plan it on paper so that all the connections are in the correct place:
Then you can transpose the paper plan onto the felt fabric. This shows where the CPX (larger circle) and two Flora neopixels eyes (smaller circles) will go:
Rob has some excellent diagrams in his tutorial showing how to connect up the CPX to the Flora neopixels.
The tutorial recommends to write the code and test the circuit using alligator clips before sewing, so I did that:
Here is the test code:
Sew the CPX to the fabric using normal thread:
I then stuck the neopixel "eyes" to the felt. You have to use the correct glue otherwise they will fall off at the wrong time! A glue that works well is Reno Art Tacky Glue.
Now I'm ready to sew the connections with conductive thread:
Follow the conductive thread sewing tips in the tutorial:- the looping technique to make a knot at the start and finish
- sew three times around the eyelets on the CPX and neopixels
- apply clear nail polish on the knots at the end to stop them unravelling
The next pictures show the fabric friend after sewing with metal thread, front and back views:
Next I have to sew the front and back together, stuff it with filling and find a good place for the battery:
THE CODEI've copied Rob's Magic Eight Ball code ideas here, with only minor alterations. Ask the Fabric Friend a questions with a Yes / No answer, then shake it. It uses a random function to come up with one of three possible responses: Yes, No or Confused. I've taken it to class and played the game with students and they like it a lot.
Here is the almost finished FF waiting to be shaken. I've tucked the tiny LiPoly battery inside: LIPOLY BATTERIESThe LiPoly battery I've bought from Core Electronics (3.7v, 120mAh) from is small enough to tuck into the Fabric Friend itself. Their advantage is superior energy density. I read up on the safety precautions about these batteries. The main danger is in charging, do not use a charger greater than the battery voltage (3.7v). If you do they can explode. Read the safety precautions and the full pdf at the adafruit site, li-ion-and-lipoly-batteries, about these batteries,
Sunday, May 02, 2021
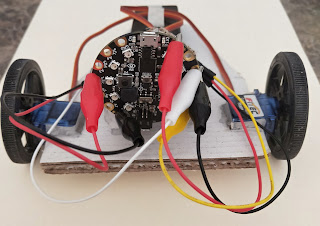
CPX light bot
Rob provides an amazon address for a continuous servos and wheels kit. I did buy that one but have since found similar materials available through adafruit (continous rotation servos, matching wheels). I'm mentioning this since, as far as I know, adafruit treats its workers far better than amazon does.
The tutorial says "Create a reinforced bottom for the front of the robot" but doesn't stress that this could be done to increase the surface area for attaching the servos by cutting notches that match the ones on the chassis. Doing that would strengthen the wheel attachments.
I bought heavy duty velcro from Bunnings (holds 3 kg) for attaching the CPX and battery to the car.
Coding issues
Rob claims that the CPX Slide Switch acts like a forever loop when moved left (always checking). I didn't find this to be true so I abandoned use of the Slide Switch and used a forever block instead.
The car in the tutorial has an awning. The plan is that when it approaches a wall the shade produces less light and this is used to trigger a reverse and turn. I found this too fiddly because light varies within a room and different times of the day. So, instead I reversed the approach and coded so the car goes forward in "normal" light and then shine a torch on the sensor when it approaches an obstacle to put it into reverse.
Here is my modified code, with some comments attached:
And here is a short video of the light bot in action:


